

Want A Pool In Your Backyard? You Don’t Need To Drop Tens Of Thousands Of Dollars On One. You Just Need A Couple Hundred Bucks And Some Grit.
It’s July. In Texas. My wife is miserable. She’s now in her third trimester of pregnancy, and this bitchin’ summer heat is making her feel especially uncomfortable.
And we’ve come up with a solution.
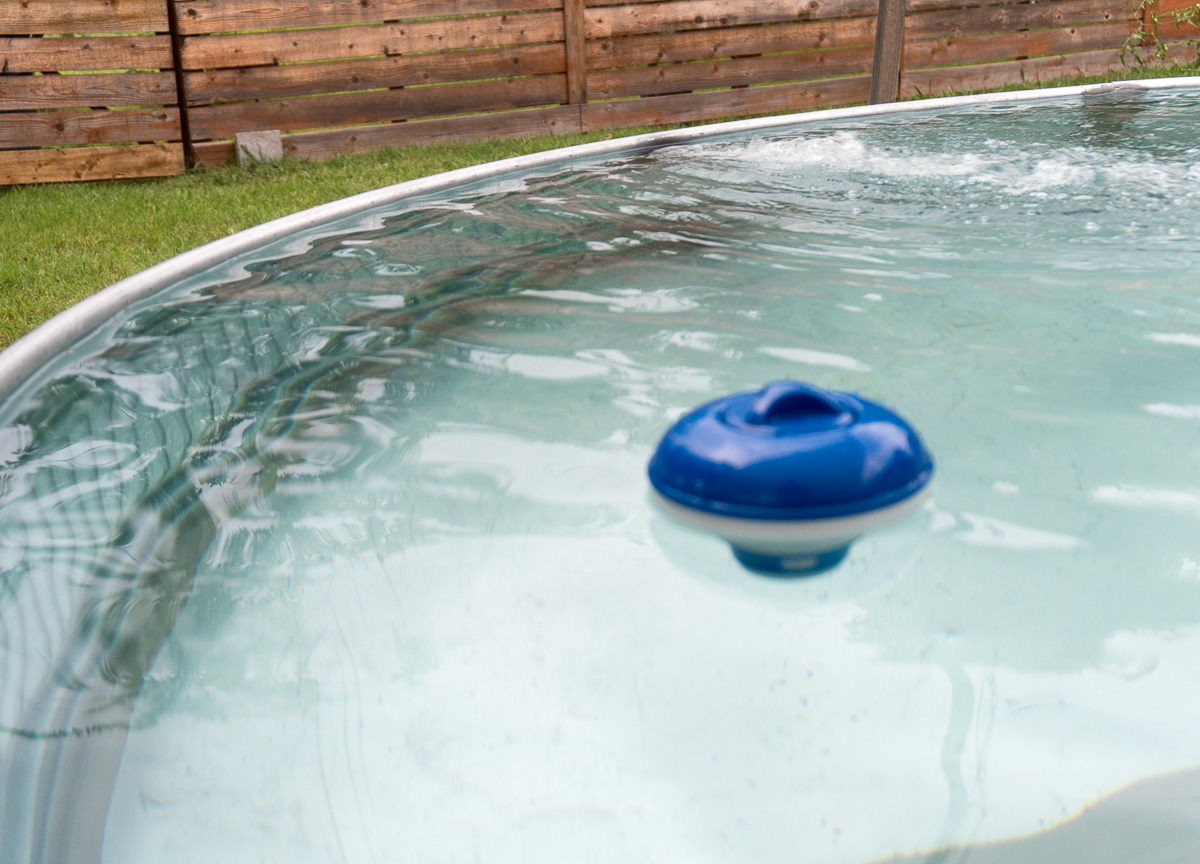
Our idea to make our very own “redneck pool” started after seeing all sorts of people on social media re-purposing galvanized steel stock tanks into plunge-type pools.
We thought about going that route, too. We even took a trip over to the Tractor Supply store to get one of those metal stock tanks, then balked at the idea of actually buying one. I mean, the tank felt really small when we looked at it on the lot. And it was crazy hot to the touch, too.
So we moved on to Plan B. We had a pool company quote us on how much it would cost to get an actual pool dug in our backyard. Those estimates came in somewhere in the ball park of $45,000. Having a real pool sounds awesome, until the whole paying-for-it part comes into place.
And so it was on to Plan C. We looked at one of those above-ground, giant hot tub things where you swim against a current but don’t actually go anywhere. Did you know that those units have both a heater and a cooler in them? That’s pretty neat. Or, well, it seemed pretty neat — until, you guessed it, we got the quote from the sales rep. Those things cost $30,000? C’mon. We have a baby on the way! We can’t be making those sorts of monetary commitments right now.
Then it was on to Plan D, which was really just us circling back to Plan A. After watching this rambling how-to video on working through a DIY stock tank project — and after seeing a similar tank at our friends’ open house when it hit the market — we had all motivation we needed to do this damn thing.
See Also:
- Dumpster Dive. // Turning A Trash Collection Bin Into A Semi-Swank, Backyard Oak Cliff Oasis.
- Is Dallas’ Summer Heat Killing You? // Take Our Quiz To Find Out.
- Cool Your Jets. // Our Best Tips For How to Beat the Heat This Summer.
At its core, the process of turning a stock tank into a soaker tub for humans is pretty simple: You just get a stock tank and you fill it up with water.
But in order to keep it clean and functioning more like a higher-tax-bracket type of pool, a little bit more leg work and DIY-ing is required. The process I embarked upon to build our redneck pool wasn’t that complicated, and it was no doubt sprinkled with a little bit a failure throughout.
In the end, though, we got the oasis we sought. My wife digs it, anyway.
Here’s how I did it.
What You’ll Need.
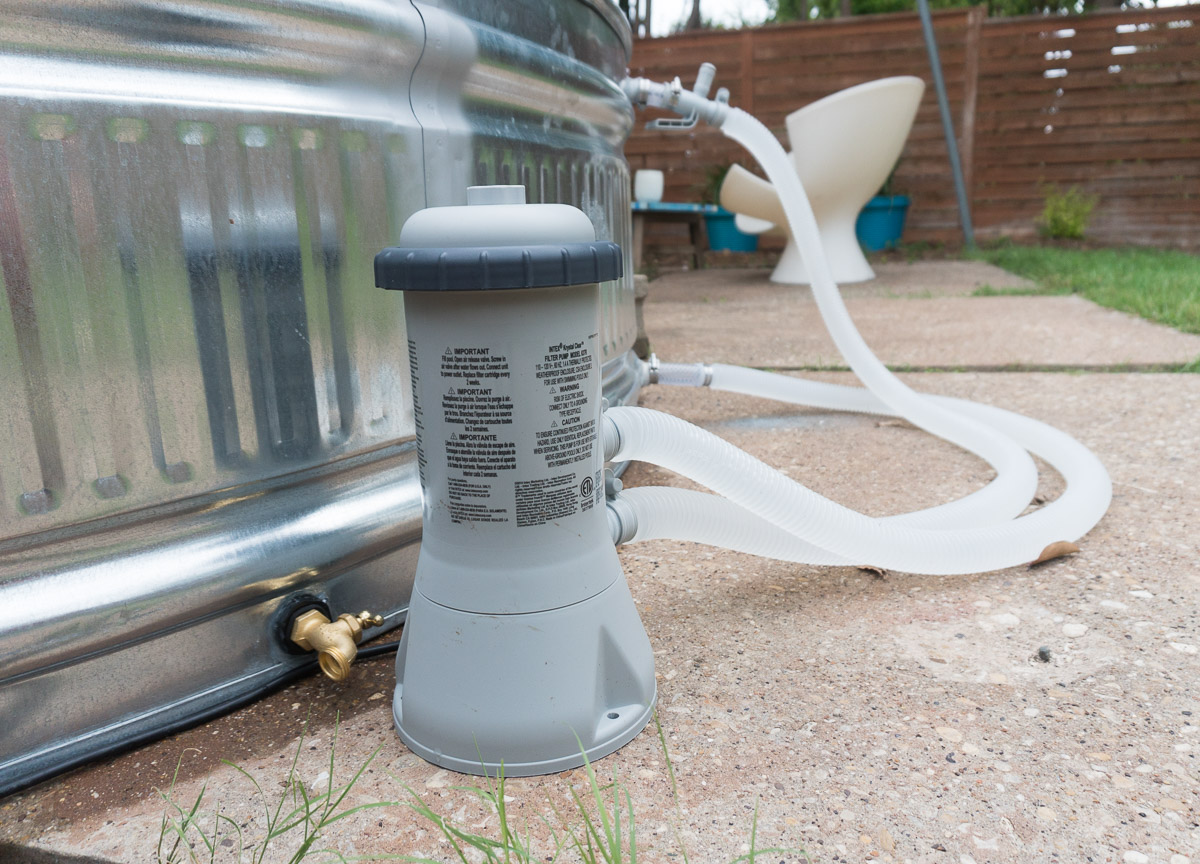
- A stock tank. We bought the 8-ft. version at Tractor Supply Co.
- An above-ground pool pump with filter ($32). This pump is nice because it comes with all the hardware you need to install it onto one of this brand’s above-ground pools.
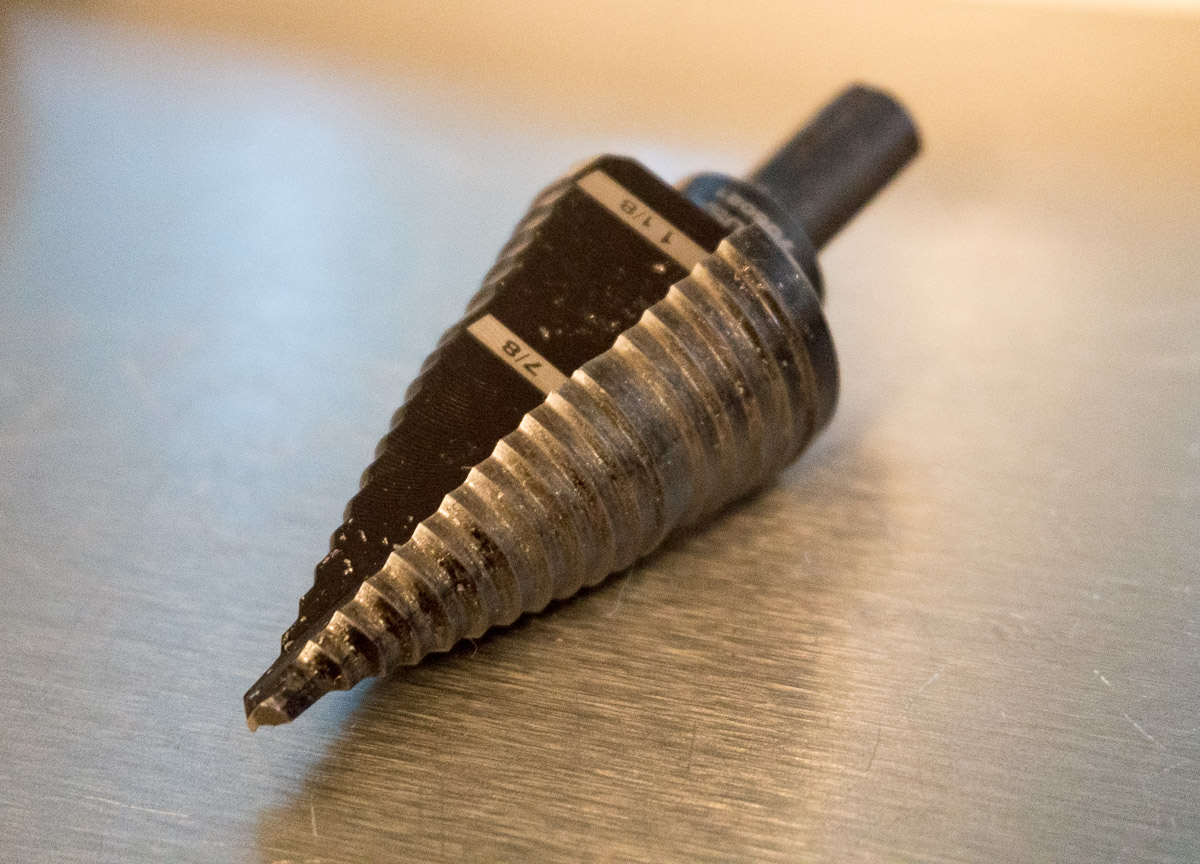
- A step drill bit.
- FlexShot, to seal parts to the tank. We heard that plumber’s putty also works, and may last longer than more traditional silicone-type stuff because putty stands up better to chlorine over time.
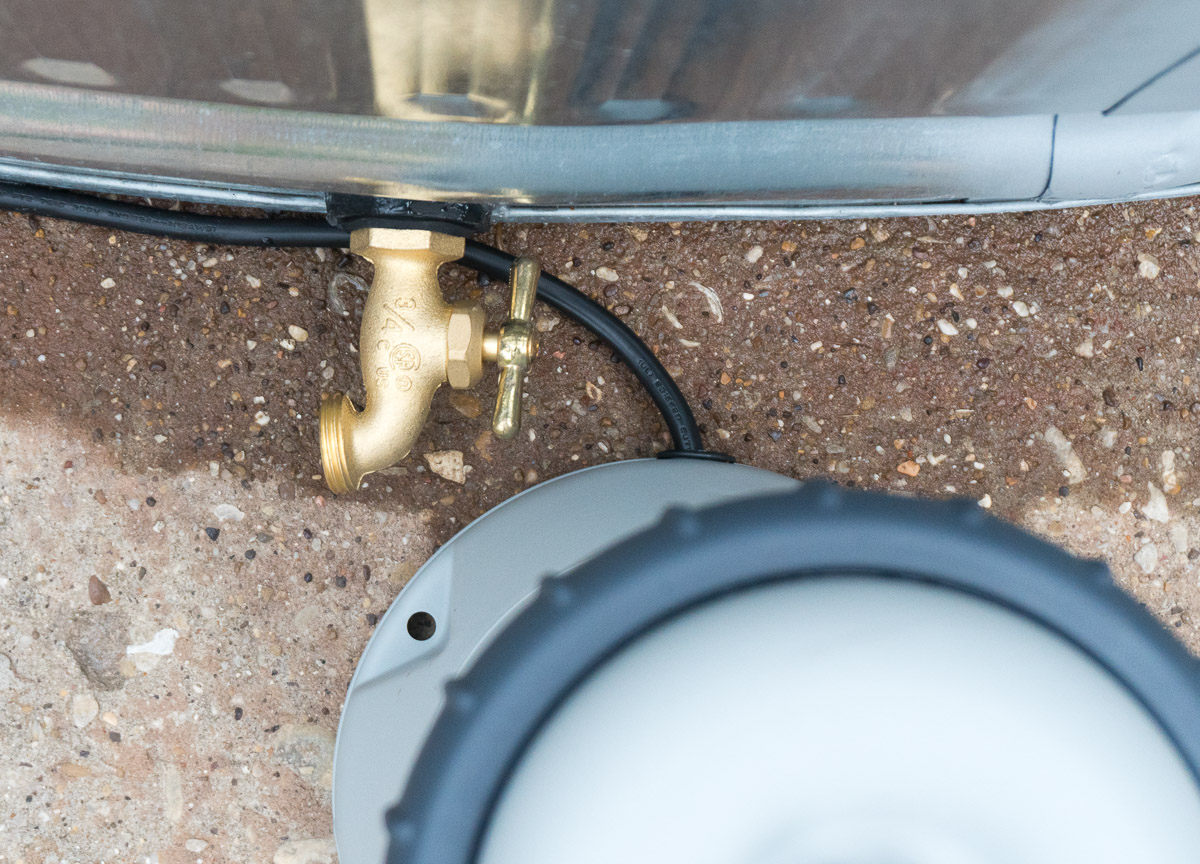
- Hose bib. (A threaded spigot to fit on the bottom drain part of the stock tank.)
- PVC reinforced vinyl tubing to make the pump parts play nice with the metal stock tank.
- Plumber’s Tape for helping seal up the hose bib connection.
- Hose clamps. I bought eight, and I’d recommend the same, just in case things get weird. They are cheap, and you might end up using them for some other random project.
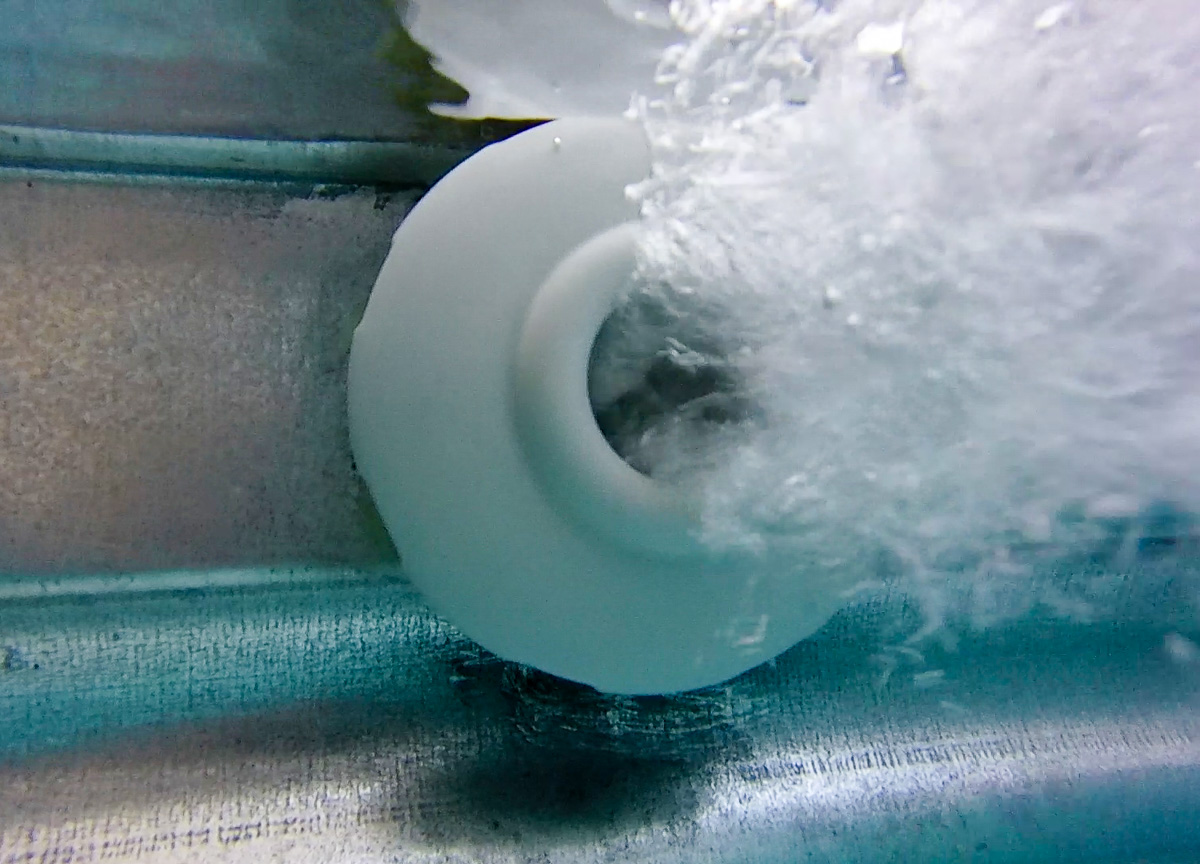
- Two toilet gasket-type rubber doo-dads to help seal your pump fittings to the inside of the pool. We classed it up with a couple of these soft toilet gaskets, which are both just the right size and look like they belong in the design.
- Chlorine tablets and dispenser, stabilizer and other pool chemical stuff as needed.
- A few beers to help maintain your sanity. Need help picking out a beer? Check out my On Tap series that reviews Dallas-area craft brews. (Sorry for the shameless plug.)
Total Cost.
$545. Well, give or take a few dollars here or there. This is what it cost us, anyway. The biggest expense was, of course, the tank itself, which ran us a cool $379. All other expenses will depend on if you can borrow the step drill bit (more on that later) and whether or not you screw up various steps in the process (you will; more on that later, too) and how many trips you’ll need to make back and forth to the hardware store. There’s almost no reason you should be spending more than $600, though. And, OK, while that’s not chump change, it’s still a whole lot cheaper than the other options out there.
The Process.
Get a stock tank. I’m not sure about other stores, but Tractor Supply Co. will rent one of their trailers to you for $15 per day so you can take your tank home. The one we rented was almost exactly the size we needed, so it fit just right. We ratchet-strapped it in and hit the road!
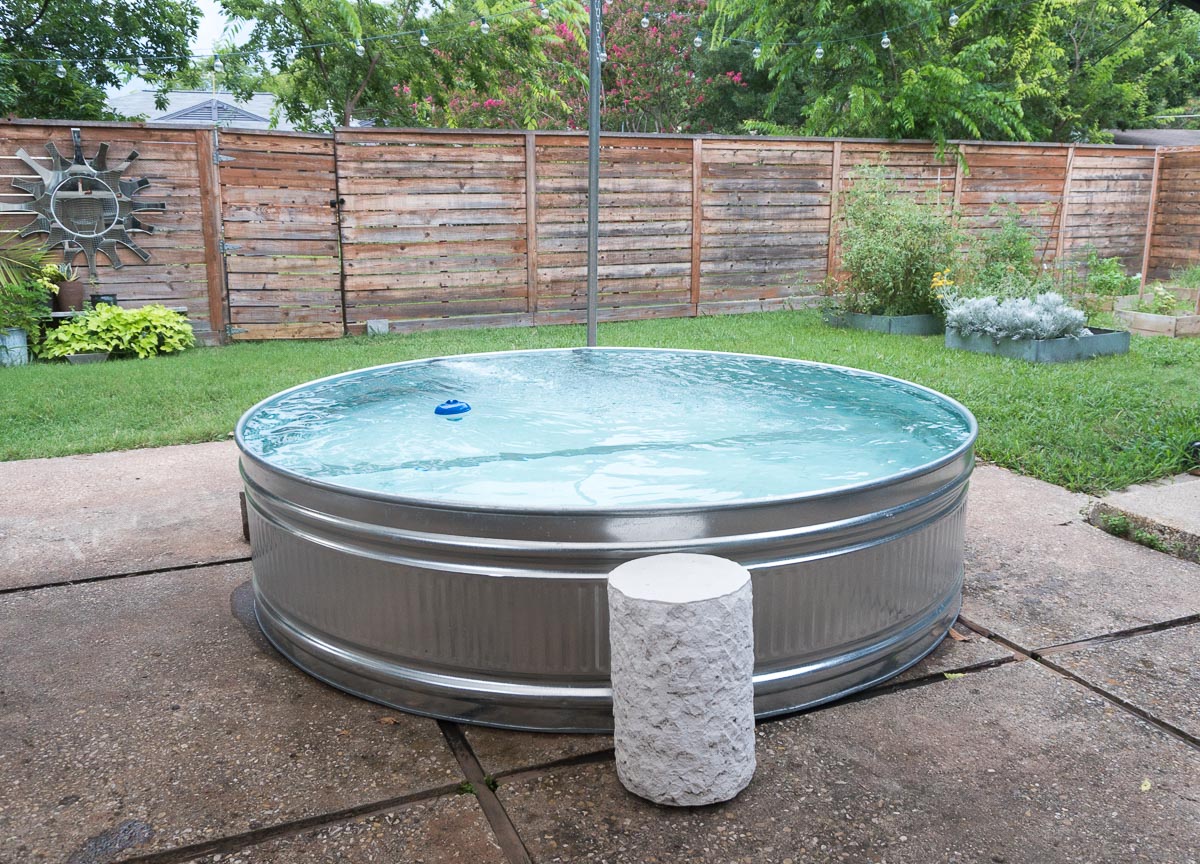
Prepare the ground or other surface you plan to install your pool upon. Because of the weight of the stock tank once it’s filled with water, it’s important to have a surface that can handle this load. So, for the love of all that is holy, do not plan on putting this pool on anything other than solid ground or one a paved patio. Also, make sure that the ground you’ve chosen is level. If the ground isn’t level, you’re going to have a weird lopsided pool situation on your hands.
Get the tank into its home spot. Once you have filled your stock tank with water, it’s very difficult to move. So make sure you’re cool with it where it is. I recommend you position the hose bib spigot situation toward your back gate or toward the direction where you plan on draining the water. You’re also going to need to make sure your pump’s power cord can reach to the tank where you want to put the pump. We put our pump on the back side so we don’t have to see it every time we look outside. You might want to do a dry run and check the reach of your pump’s power cord before you commit to that final resting place.
Attach the hose bib. First, remove the plug that came with your stock tank. That will leave a threaded, unplugged hole there. Your size may vary, so figure out what size you need, along with the thread count. Why a spigot hose bib thing? Well, once you get the tank chlorinated and you need to drain it, you can connect a hose to the spigot and drain the pool — not just right into your yard but wherever you aim the hose. This is important because dumping a ton of chlorinated water into your back yard could kill the grass. Wrap the threads a few times around with your plumber’s tape to help seal up the threads and get a more water-tight seal. I grabbed the small o-ring that came with the original tank plug and crammed it on the thread-ends of the hose bib, then screwed it on the outside of the tank. Obviously, if your drain plug is drilled as low as the one in this picture, make sure you point the hose bib out horizontal to the ground so you can get a hose to attach to it.
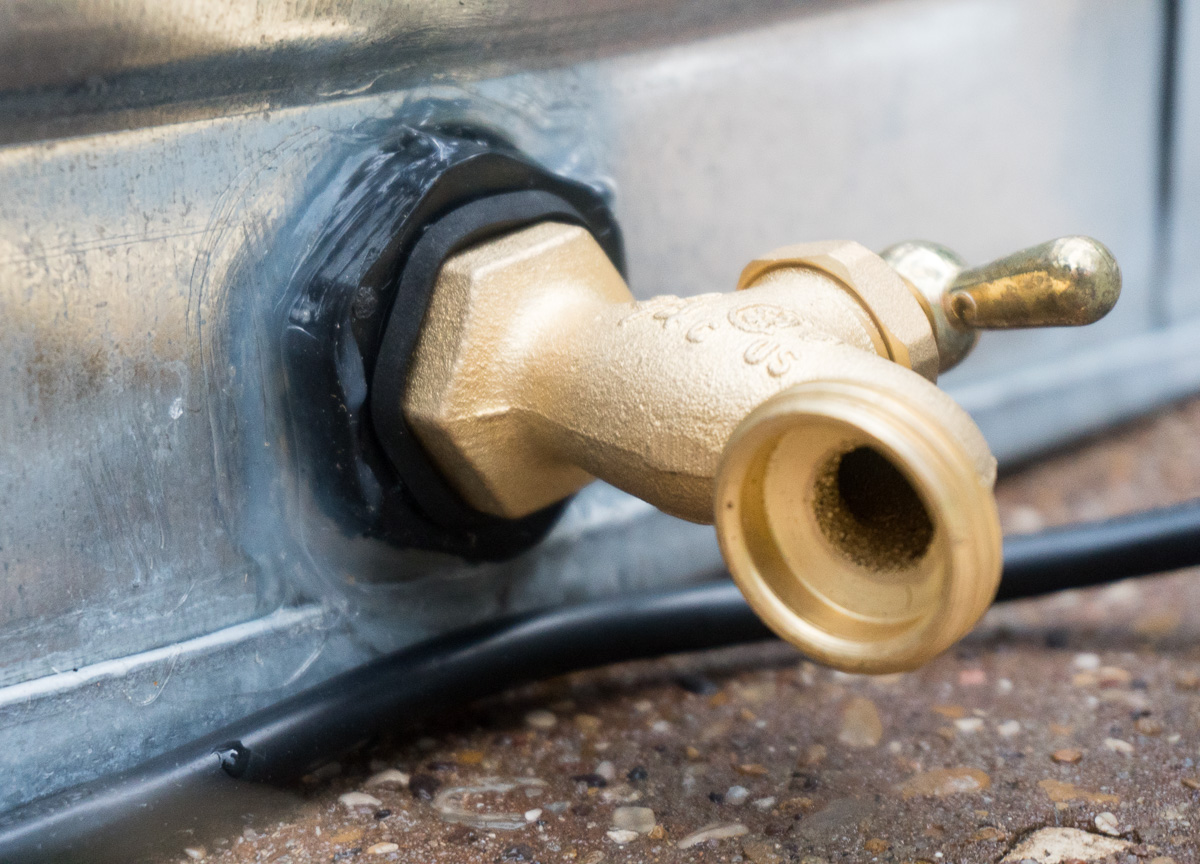
Seal the connection area for the hose bib. Take your FlexShot or plumber’s putty and give the outside edges of the tank plughole a good amount of sealer. If you’re feeling extra ambitious, hit it on the inside with the sealer too.
Cut holes for the pump and filter. Make sure that the size you buy will work for the size of the hole you need to drill through the stock tank. For the Intex pump linked above, the outside diameter of the pump fittings is approximately 1 1/8″. So we bought a step bit that drilled from 7/8″ to 1 1/8″, and it worked perfectly. Just a heads up on this: Borrow this part if you can. It’s a $50 drill bit – yikes! Also, make sure you only drill the hole to be just big enough for the size you need. Otherwise, you’re going to spend a lot more effort trying to make a couple of gaping holes watertight.
Mount the pump parts and seal them with sealer/putty. Line up the input and output parts of the pump according to the directions on your pump’s instruction manual. The idea here is to seal the input and output onto the side of the tank before you attach the hoses and the rest of the parts. Get a good amount of sealer on both the inside and outside where the input and output parts connect to the tank. I would recommend waiting about 24 hours to let the sealer you use get nice and firm. We got in a hurry and had a leaky situation on our hands in our first attempt. Yes, that meant we had to drain the entire tank and start over.
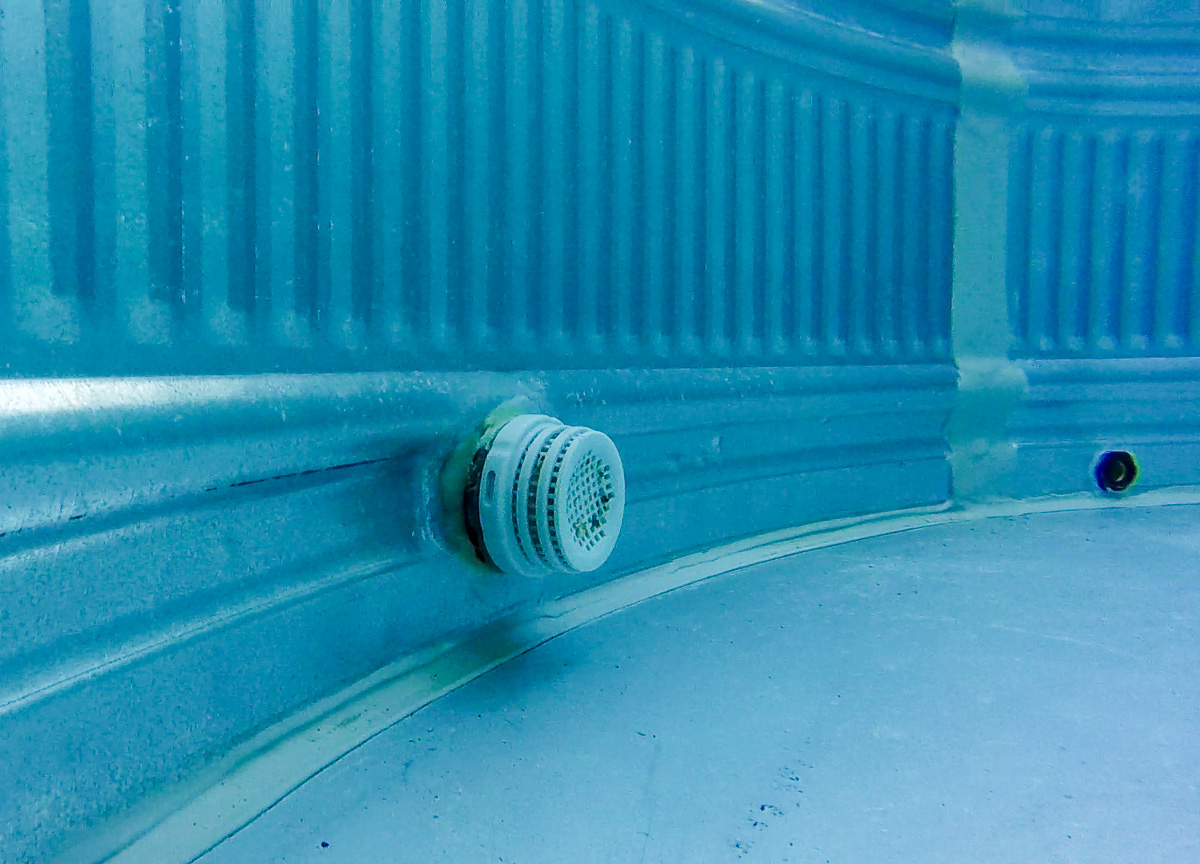
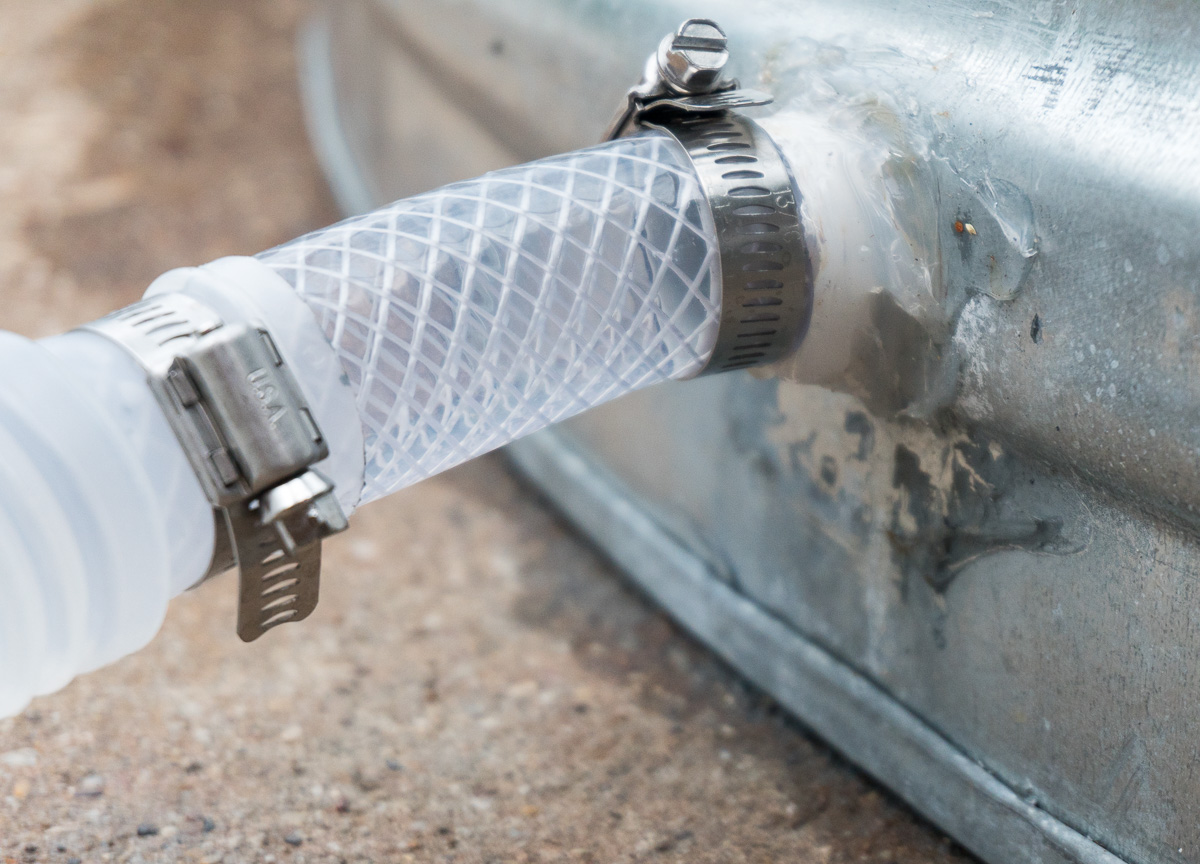
Connect the pump. OK, so this is the tricky part. Since most above-ground pool pumps aren’t meant to connect to metal, this is where you may have to do a little extra DIY hacking. To connect the two parts of plastic to each other, there needs to be some sort of gasket or connector. We used vinyl braided tubing, and clamped it all down real tight with hose clamps. Before you shove the braided nylon tubing onto the parts, make sure you have a couple hose clamps slid on there already, ready to go.
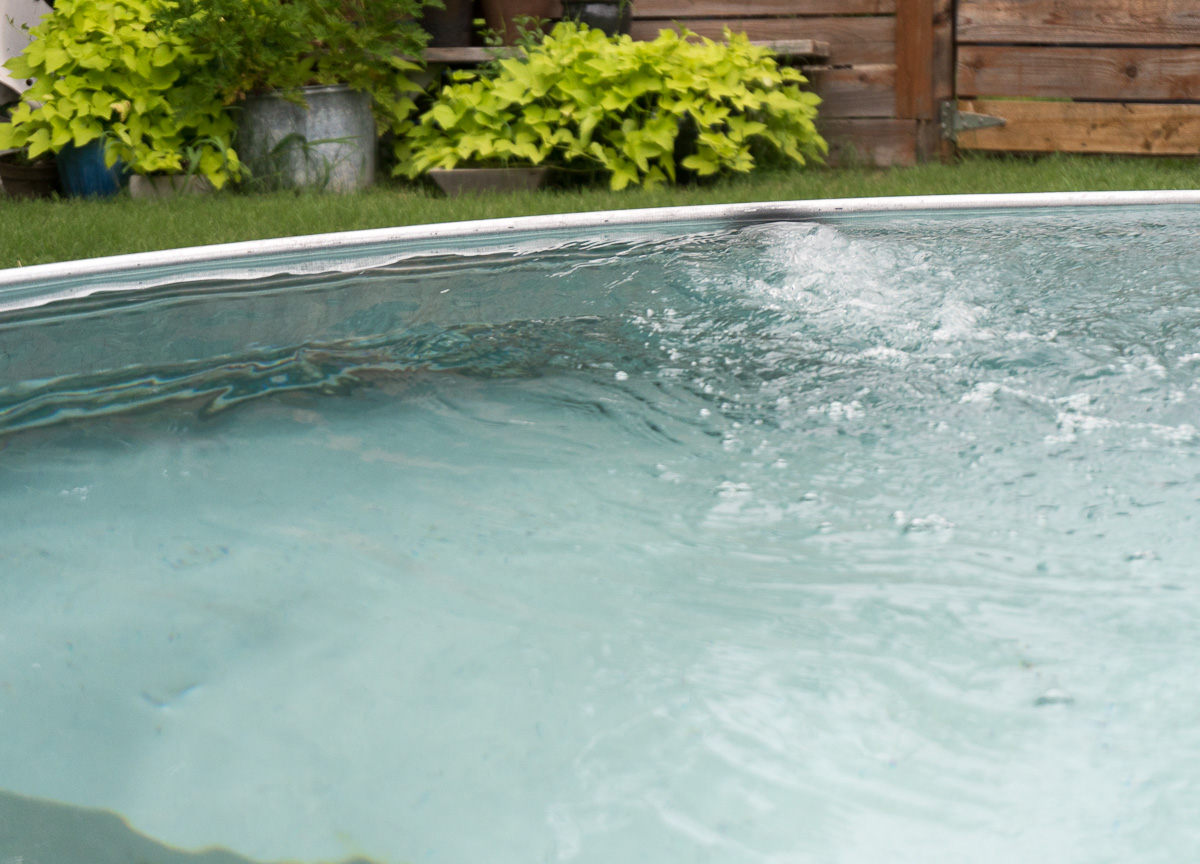
Fill ‘er up. Fill the tank with water. This takes a little while — longer than you might think — but you’re going to want to stick around the house during this process. If you notice any of your fittings leaking, you can empty the tank down to below the level of your fitting, then re-seal it, let it cure and try again. On your pump, close off the air vent if you see it leaking.
Start the pump. Unlike Donald Trump — who does not understand what “priming the pump” means — you actually are going to need to prime this pump before you fire it up. At this point, you’re going to have water in the hoses, ready to go. But you will probably have some air trapped in the pump unit itself, too. Unscrew the air vent on the top of the pump just a little so that you can see bubbles or air coming out. As soon as you see water spewing out, tighten the pump’s air vent back down. Now, the pump is primed and ready for action. This is the point where you’ll finally plug in the pump. Still confused? Watch this clip.
More Tips.
If you can find a stock tank with smooth sides, it will make mounting and sealing the input and output from the pump a lot easier. We tried to drill holes on the flattest surfaces we could find. Your experience may differ depending on what sort of side shape you’re dealing with.
But, hey, embrace failure! Because the filter pump isn’t made for a metal tank, it takes a bit of tweaking. We tried shoving some rubber washers into the plastic bits that attach to each other, and it was a leaky failure. We tried sealing the holes on top of some galvanizing spray, but the silicone mixed with the leftover paint on the surface and it failed the leak test too. We had everything working for two days then, only to come home to the pump’s return connection leaking again. So don’t expect that you’ll nail this project on the first try. It’s tough.
That’s why it’s probably a good idea to get to know your plumbing person at your local Lowe’s. We met a guy named Pete at a Lowe’s near our house, and he was super-helpful. The guy knew his stuff! After he cut the braided tubing into sections for us, he walked us through some tips for getting over the finish line. (Thanks, Pete!)
Also, buy a skimmer. The pump filter isn’t going to get bigger debris out of the pool. You are.
And there it is, folks. Once it’s all set up, you can enjoy a tiny piece of paradise in your own backyard.